6.29.2011

Day 29: Journal

June is almost done and with July fast approaching, I decided now is a good time to set a new month long goal. I have been reading a lot about modern information overload (which of course only adds to my personal overload) and have decided that for the month of July I am going on a media diet. Basically I want to cut out all of the unnecessary time I spend staring at screens so the plan is to spend none of my non-work time on a computer and even though I need to use the computer for work, I am only allowing myself 15 minutes of facebook per day and 15 minutes of personal email.

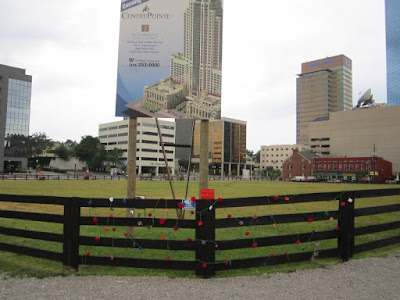
Instead of wasting my free time online, I plan to fill it with reading (only fiction), exploring, talking with friends, and creative activities. I also want to keep a journal of my month so for today's creative act I gutted an old book and added blank pages to make a new journal. The tag pictured is one of several I found in my dad's shop when searching for the right sized drill bit. I am pretty sure it's one of those tags you punch through an animals ear, but since there is no chance of that happening I grabbed one to make into a bookmark.


Next week I am on stay-cation and one of the first tasks I have planned for my time off is to build and paint an Adirondack chair so I can sit outside, not on the grass, and enjoy my morning coffee. This used to be my morning ritual and it was a lovely way to start the day so I am bringing it back.

6.28.2011

Day 28: Salt Scrub

For the last several years mosquitoes have avoided me, but my body chemistry must have changed because this year I seem to be a mosquito buffet. To remedy this I decided to make a salt scrub that would double as a repellent for those little creatures who feel the need to bite me. This simple scrub is 3 parts sea salt, 1 part oil, and a bit of lemon eucalyptus and citronella essential oils. It doesn't smell great, but it smells way better than chemical bug spray and it will do the job.

6.27.2011

Day 27: Extinct Mediums

Another day where I follow the theme, the last time in this challenge. This yarn is a combination of reclaimed scraps and a tape of the Dalai Lama speaking on the four noble truths that I liberated from southern thrift store hell. Despite tape being on a spool, it is remarkably difficult to get out of the cassette in a smooth motion, the entire spinning session was a war with the tape. On the plus side, the yarn is pretty soft and very workable which is something I wasn't expecting.

6.26.2011

Day 26: Unicorns

Today's theme is unicorns so I decided to spin a yarn inspired by unicorns. I started with domestic kid mohair top, some handdyed firestar, silver angelina, and some various pink and purple dyed fibers. I sent everything through my drumcarder twice to get the mohair cloud effect and then I spun it around a commercial lace core (handdyed by me.) This was one of the most difficult yarns I have ever spun- I had books, videos, and diagrams to help but ultimately ended up figuring it out through trial and error. I have been spinning a lot this summer (at least 2 hours of every shop shift since May) and I am really seeing an improvement in my technique. I can't wait to see what I am producing toward the end of the summer.

6.25.2011

Day 25: Hypotrochoids

On my way to work this morning I stopped at a yard sale where I picked up a hypotrochoid kit for $1. I then proceeded to spend several hours drawing and distributing hypotrochoids on little pieces of scrap paper. This is a quick shot of my lunchtime doodles.

6.24.2011

Day 24: Plaid yarn

I haven't been following the theme calendar for the 30 day challenge, but on Thursday I noticed that the theme of the day was plaid. I had been thinking about trying a fabric yarn during this challenge and this was the perfect opportunity. I headed out to the thrift store and found a long plaid skirt for $3. Unfortunately when I got back home I was distracted by the wire and ended up making more wire yarn instead. Today the skirt was taunting me so I cut it into strips, tied the strips together, and spun up a skein of plaid yarn. I am not in love with the idea of fabric yarn, but it was fun to try out.

6.23.2011

Day 23: Wire Yarn Take 2

My second attempt at wire yarn, this time using a 24g wire.

6.22.2011

Day 22: Wire yarn

A small puff of Monday's batt spun around a 28g brass wire core. I love this so much that I am making a second skein today with thicker wire and scraps of another batt. I think this will likely become a wire bowl.

6.21.2011

Day 21: Even more corespinning

I had a big fluffy batt so naturally I wanted to make it into yarn. I know you are probably tired of reading about my corespinning adventures, but as a lover of crazy fiber batts, corespinning is often the best way to show off the blends.

6.20.2011

Day 20: Batty

Today I took some of the fibers that I hand dyed and blended them on my drum carder to create beautiful batts for spinning. This batt is a full 6oz and contains absolutely no sparkle (a first for me.)

6.18.2011

Day 18- More Corespinning

Spun from an art batt that I bought from last years fiber fest, this is a superbulky, thick and thin pile of fluff. I think this winter it will become a hat.

6.17.2011

Day 17: Boozy Baking

My first attempt at cake pops- chocolate and Maker's Mark.

6.16.2011

Day 16: Stabby

Today I made dryer balls using this very simple tutorial. I had some plastic dryer balls that disappeared a few years ago so instead of replacing them with more petroleum-based products I decided to use the natural materials I had on hand to make new ones. I just bought a retractable clothesline for my backyard which means I will be line drying for the summer so I won't try these out until the cooler months, but six balls in the dryer are supposed to cut 30% off drying time and eliminate static.

6.15.2011

Day 15: Glue

For my creative act today, I glued stuff to other stuff. I am in the process of cleaning and organizing my studio and yesterday I put all of my random buttons in a jar so that they don't take up as much space and a few minutes later I stumbled upon a giant bag of ring blanks. I pulled out my favorite adhesive and within minutes I had sticky fingers and a small selection of cute little rings.

Since I had the adhesive out I also pulled out the pack of Little Red Riding Hood pinback buttons that I bought last weekend at Wholly Craft and attached strong ceramic magnets to the backs so that I can enjoy them everyday.

6.14.2011

Day 14: Corespinning

At last year's Kentucky Sheep and Fiber Fest I bought a braid of beautiful combed top from River's Edge Fiber Arts. The braid has been in my stash for the last year, taunting me, so today seemed a good time to do something with it. The top is 70%BFL, 30%Seacell and 4oz. Usually I buy a minimum of 8oz, but upon looking at the braid and the price tag I think the price might have restricted me to just one. After looking at the braid and trying to decide what it should be, I decided I wanted it to be a light and fluffy corespun art yarn.

The core is that same rug yarn from the vine project. I ran it through the wheel to incorporate a strong Z twist (so that my final yarn is nice and balanced.) Then I controlled it with my left hand as I wrapped the top fiber around. Sound easy? Well, not quite. The top was slightly felted from the dying process which led to constant drafting struggles (remember my left hand was controlling the core so my drafting movements were limited.) After a lot of swearing and several breaks, I came up with a system that worked. Despite the struggles, I achieved exactly the the yarn I envisioned.

6.13.2011

Day 13: Crochet

For the past few years I have been in the process of phasing out several of my personal care products in favor of things that are more environmentally-friendly and local. One of the more difficult changes for me is eliminating the products that are diluted with water in favor of denser, drier products. I did the no poo thing for awhile with baking soda and it was okay, but I really craved the lather of a shampoo and I missed the lovely way my hair smells after a wash. I decided that a natural shampoo bar would be a good compromise since it still uses less packaging and has less water than traditional shampoos. Switching to a shampoo bar has been an off-and-on two year trial, apparently my hair is really picky about what I use to clean it. Recently I stumbled upon a winner, but it is not cheap stuff so I decided to make a little soap saver to keep it in. This is just a simple crocheted pouch with a drawstring that I made with some leftover Euroflax. The purpose of the pouch is to get more suds out of a single bar and to help it dry faster which will make it last longer.

6.12.2011

Day 12: More knit grafiti

My friend Mindy is working on a yarn bombing project for the parking pole outside of a downtown bar so I knit up a 12" section to contribute to the project. Not sure when the finished piece will go up, but I will post a picture.

6.11.2011

Day 11: Installation

Before leaving for Columbus this morning, I met with a few members of the Tree Sweater Gang to install the vine on the Main/Limestone corner of the CentrePointe block. This is an action I have been planning since they first surrounded the block in horse fencing. We did the installation at 7am so that it would be up for all of the downtown farmers' market traffic. The final vine was over 100 feet with about 50 flowers that were held to the vine with coilless safety pins so they could be "picked" by passers by and worn as broaches. The installation went smoothly despite the unexpected amount of traffic downtown and the threat of rain. Hopefully the farmers' market shoppers enjoyed the little Saturday surprise.


6.10.2011

Day 10- Assmembly

Tomorrow is International Yarn Bombing Day so to celebrate I decided to create an interactive installation that will be placed downtown in the morning. As usual, I took on way more than I can handle, but luckily members of the local knit graffiti group, the Tree Sweater Gang, volunteered to help me out by making the flowers. Since I only allowed myself a week to work on the project it is about a fifth of the size I had planned, about 100ft instead of 500ft, but I think it will still give the same visual effect and it will take less time to install (which is a huge plus considering where I plan to install it.) Here's a peek at the project as it comes together. I am still not putting all of the details out until it's up because I don't want to spoil the surprise.


On a side note, I will be out of town all weekend so I will post days 11 & 12 on Monday. I actually have no plans for what I am going to create during those days which will be filled by looking at others creations at the TNNA summer show so I guess it will be a surprise for both of us.

6.09.2011

Day 9- Face Cleanser

For the past few weeks I have been experimenting with oil ratios to use with the oil cleansing method. After several trials, I have put together an oil blend that works well with my skin and today I finally mixed up and bottled the blend. I really like the oil cleansing method because it is all natural and the application is a complete joy, a great end to a busy day. You can read more about the oil cleansing method here.

6.08.2011

Day 8- more leaves and vines

This mess is part of a larger project to be revealed soon. So far I have about 50 feet of i-cord and 20 leaves. I will need a lot more before Friday so back to work.

6.07.2011

Day 7- Digital Manipulation

A 10-hour workday preceded by 3 hours of sleep left me too tired and grumpy to do much creating so I used a bit of my time today to work on my Photoshop skills, mainly creating and using actions. I have a little experience using actions for things like layouts and mass editing, but not with creating effects which is what I worked on today. I worked with several images, but I love the way these chickens came out. The goal was to get a Lomo effect and I think it's a good start. I tried creating "light leaks" around the edges, but they felt too forced so I removed them.

6.06.2011

Day 6- Jamaican Sorrel

This is a co-creation, but I am posting it anyway since this drink is overflowing with fabulous. Yesterday when I was making the lavender lemonade, I posted a picture on my facebook page stating that I used too much hibiscus in my lemonade which led to a a discussion of what to do with dried hibiscus. My friend Jess told me about this Jamaican drink made with hibiscus, ginger and rum and we decided to whip up a batch late last night (continuing to early this morning which is why I will count this as day 6.) This drink is best served cold on a summer night in the company of friends.


Jamaican Sorrel
1/2 cup dried hibiscus
2.5" fresh grated ginger
1 cup sugar
lime juice
dark Jamaican rum
water, both solid and liquid

Put the hibiscus and ginger in a small saucepan with 4.5 cups of boiling water over top, add sugar, cover and let steep for 20-30 minutes. Strain with a fine mesh strainer into a large pitcher. Add lots of ice and refrigerate.

Fill an old fashioned glass with ice, pour 2-3oz. of rum over the ice and fill the rest of the way with the tea. Add a squeeze of lime juice and garnish with a sprig of mint.

6.05.2011

Day 5- Lavender Lemonade

I promised that all of my creative activities wouldn't be fiber related and here is the first non-fiber entry. About a month ago a friend invited me to join a local book group. This is something I've wanted to do for quite awhile, but I haven't been able to find one that fits and I am way too lazy to start my own. Anyway, the next book they were reading was The Hunger Games, which I completely devoured last fall (as well as the two sequels) so I was totally in. The meeting was today, picnic-style in a local park so I had to bring something and since no one was down for a beverage I decided to bring lavender lemonade.

I haven't always been a fan of lavender lemonade, in fact the first time Sarah made it for me I didn't like it at all, but after a few more interactions with this lovely substance I grew to love it. There are a million recipes for it online, but basically you just need to find the ratio of lavender to lemon that works for you. Here is my recipe which utilizes dried hibiscus to give it a little (or in today's case, a lot) extra color, a trick I learned from my former sister-in-law who truly understood the fabulousness of pink lemonade. Without the hibiscus, the flavor will be the same and the color will be a really pale pink. Either way this is the perfect beverage for a lazy summer day.

Pink Lavender Lemonade
1/4 cup dried organic lavender
1/4 teaspoon dried hibiscus
1/2 cup lemon juice, freshly squeezed
3/4 cup sugar
water, both solid and liquid

Put the lavender and hibiscus in a small bowl, pour 3 cups of boiling water over top, cover and let steep for 15-20 minutes. Strain with a fine mesh strainer to remove all of the lavender flower and hibiscus leaves.

In a small saucepan, combine the sugar with 3/4 cup water and heat to create a simple syrup.

Fill a 2 quart pitcher with ice. Add the lemon juice, simple syrup, and lavender tea and fill the rest of the way with water. Refrigerate and serve with a lemon slice.

6.04.2011

Day 4- Leaves

I can already tell that the blogging is going to be the most difficult part of this challenge for me, but thanks to the magic of the interwebs I can post date this entry and pretend that I put it up yesterday, don't even need a TARDIS. Anyway, as part of the top secret project for Saturday I need leaves, lots and lots of leaves. Leaves are pretty easy to design with simple shaping and I already had the leaf pattern I created for my Immaculate Heart of Mary design, but I didn't really like the way it transferred to large leaves. Instead I created a new leaf that is simple enough to work on anywhere and won't curl like stockinette leaves. I also like that it is easily identifiable, even out of context. This pattern can be used with any size needle and yarn, but I used a light worsted on US6 needles for mine.

Basic Leaf

CO 3sts
Row 1: knit
Row 2(and all even rows): knit
Row 3: k1, m1, k1, m1, k1
Row 5: k2, m1, k1, m1, k2
Row 7: k3, m1, k1, m1, k3
Row 9: k4, m1, k1, m1, k4
Row 11: knit
Row 13: k3, k2tog, k1, ssk, k3
Row 15: knit
Row 17: k2, k2tog, k1, ssk, k2
Row 19: knit
Row 21: k1, k2tog, k1, ssk, k1
Row 23: knit
Row 25: k2tog, k1, ssk
Row 27: knit
Row 30: sl1, k2tog, psso and pull yarn through.

For those who don't want to deal with a pattern you simply start with 3 stitches, make a set of mirrored increases every other row until you have 11 stitches. Then you will make mirrored decreases every fourth row until you are back down to 3 stitches.

6.03.2011

Day 3- Dyeing

Today's project is not very exciting. About a year ago I was given a very large amount of rough yarn that I have been trying to work through. Really this yarn is best suited for rug type projects, but I don't knit rugs so I have been trying to incorporate it into other non-wearable projects.

Here's the yarn, sorry about the picture quality, this shade of green is one of the colors that digital cameras have trouble with so just imagine a mix of bright spring greens with small sections of cooler greens.


For this yarn, I decided to try out my organic-certified dyes and since they dyes were a little more eco-friendly than what I normally use, I also decided to use rain barrel water for the rinse and the dyebath. This is my first summer with rain barrels and I am slightly obsessed with finding as many ways to use the water as possible and since this yarn is to be used for an outdoor project I wasn't too worried about the possibility of a little debris in the dyebath. If I wanted to be really green I would have constructed a solar oven to set the dye instead of using my stove, but I am not quite there, yet. All-in-all everything worked out, but I did end up dyeing the yarn twice because the green dye came out way too blue for my taste. Usually I mix my own colors, but since the dye samples I had came with secondary colors I went ahead and used their green and ended up overdyeing with a yellow to give me more of the color I wanted. I don't want to base my review of these dyes on my experience with the green so I will do some mixing and experimenting with the primary colors and post a review at a later date.

Oh and if you are wondering about the project this yarn is destined for, you will just have to wait until next week when the secret is revealed, hopefully it will be worth the wait.

6.02.2011

Day 2- My Left Lung

I am working on a series of embroidered anatomical drawings on felt. This is actually the second one I have completed, but due to my lack of measuring the heart did not fit the frame and must be redone. The lungs are not anatomically correct (notice the lack of a bronchial tubes,) but they will loosely mirror each other and sit on the wall as a triangular triptych with the new heart- all in gold leaf frames.

6.01.2011

30 Days of Creativity

It's been awhile since I've blogged, quick blurbs on facebook are so easy that the blogging has taken a back seat. Today is the first day of the 30 Days of Creativity challenge which seemed like the perfect opportunity to pick back up on the blogging. I plan to do 30 blog entries to accompany the 30 creative activities, some will be detailed, some might just be a picture and a caption. We'll see how it goes. Most of my projects for the challenge will be fiber based because that is what I do, but I have plans for a couple non-fiber projects. For the first few days of the challenge, I will be finishing up a few larger outstanding projects so that I can clear the queue before taking on new stuff.

First up is the yarn spun from local fiber. I actually started spinning this last week as part of my summer spinning challenge, but today I did the plying, reskeining and set the twist so it counts.

In the end I came out with two skeins totaling 8.3oz, 456yds.